Friday, January 31, 2014

Bronco snacks!

The Superbowl is just days away and I can't wait to whip up some yummy treats for everyone to share. A few of the recipes on the menu are: Pinwheels, jalapeno poppers, and sausage balls.


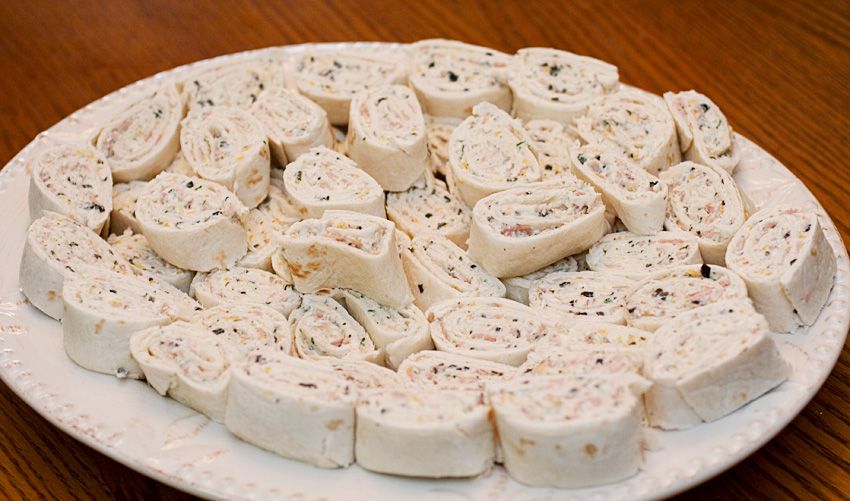
Let's start with pinwheels!

You will need:
burrito sized tortillas- an 8 pack
2 packages of 8 oz cream cheese (no low fat this time, folks)
1 packet of  dry ranch dressing mix
1 large tomato or can of petite diced tomatoes
1 bundle of green onions
*sliced deli meat (turkey or ham) optional

1. Dice the tomato and finely chop the onions (I use scissors)
2. Mix the cream cheese, ranch packet, tomato and onion in a large bowl. I use an electric mixer or my kitchen aid for this.
3. Next lay out the tortillas and cover surface of the tortilla with the cream cheese mixture.
4. Layer the meat on top of this and roll tightly and allow to set up in the refrigerator for about an hour.
5. The slice up each roll into 1/2-1 inch sections!


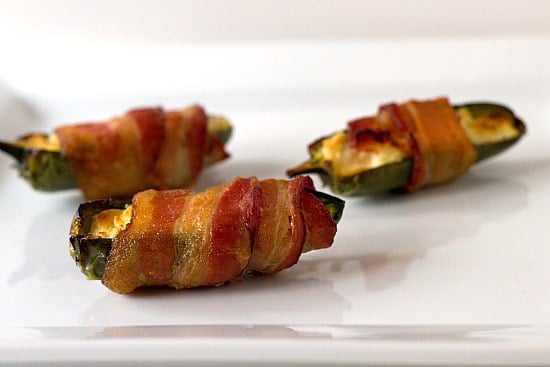
Next up Jalapeno poppers:

You will need:
About 20 fresh jalapenos
2 packages of 8 oz cream cheese (you can use 1/3 fat for this one)
1 packet of dry ranch mix
1 lb of any kind of bacon

1. Preheat oven to 375.
2. Cut peppers in half long ways and remove all the seeds (DO NOT touch your eyes, I repeat DO NOT touch your eyes)
3. Mix the cream cheese and ranch powder together in a bowl.
4. Spoon the cream cheese mixture in the seeded peppers.
5. Wrap bacon slices around the peppers and secure with a toothpick.
6. Arrange the peppers on a foil covered cookie sheet
7. Bake for 20-30 minutes until bacon is cooked through. If the bacon isn't quite finished turn on the broiler and let them get nice and crispy.
8. Remove and wait a few minutes to serve.


Sausage balls

You will need:
1lb of hot breakfast sausage uncooked
3 cups of Bisquick mix
4 cups of shredded cheddar cheese
1/4 to 1/2 cup of milk just to help things stick together

preheat oven 350

1. Combine sausage and cheese in a bowl.
2. Gradually add in Bisquick mix, I use my kitchen aid  for this step
3.Add in milk until mixture hold together
4. Roll the mixture into 1-2 inch balls and place on a lined cookie sheet
5. Bake 25-30 minutes or until golden brown and sausage is cooked through
6. We like to eat ours fresh out of the oven!

Sausage Cheese Balls

Wednesday, January 29, 2014

Taco cups!


Another super easy, yummy, picky kid eater approved recipe! It seems like lately that we have putting all of our food into a cup cake tin, hmm weird.

You will need:

Flour tortillas I used the medium size (the recipe called for wonton wrapper, but I search the store HIGH AND LOW to no avail)
1 lb ground beef (I use 92/8)
1 packet taco seasoning (I have heard that you can make this yourself, I am going to try that at a later date and time)
Refried beans (I use non fat)
Salsa (any kind will do)
shredded mexican blend cheese.

Preheat oven to 350.
1. Brown the hamburger meat on medium heat.
2. Spray the cup cake tins with cooking spray.
3.Tear the tortillas in half and fit them into the cup cake cups.
4. Once the meat is cooked through, add in the taco seasoning and add a titch of water just to mix everything together.

5. Then add the meat to the cups.


6. Then add the beans, straight from the can.
7. Next up, salsa.
8. Last top with the shredded cheese.

9. Bake in the oven for about 20-25 minutes.
10. Pop the taco cups out of the tin and add your favorite toppings. The girl and I smother ours in sour cream, the mister slathers his in green chile sauce.


Tuesday, January 28, 2014

What I wore last week


Here are some of the things I wore last week. Callie has gotten on the fashion bandwagon too, this past year with choosing her own clothes and she asked if she could share her fun clothes too, so I will have to add those next week!

polka dot sweater: forever 31
plaid button up: american eagle (gift from MIL)
denim leggings: forever 31
necklace: Target
boots: target

Sweater dress: target
grey tights: kohls
boots: target
lace sleeve sweater: forever 31
maroon pants: thrifted
medallion flats: amazon
leopard scarf: target

cable knit cardigan: old navy
purple vest: izod outlet
grey dress pants: thrifted
nude heels: target
necklace: ?


Monday, January 27, 2014

Easy Peasy mac and cheesy

At our house, we love mac and cheese. Not as a side dish. As and actual, real life, meal.Sometimes we have a veggie with it, if we are feeling a little healthy. But there really is nothing better than a cheesy, gooey, buttery plate of macaroni and cheese, all by it's self. It's pretty much the only thing Callie would eat for about a year, and the only meal that we currently don't have to beg her to eat.
I served this with corn (we had to get a veggie on there) mmmm, yellow food ;)


I started experimenting with some recipes over the years and this super easy recipe is a culmination of a several other recipes. Here goes!

You will need:
1 box of elbow macaroni (has to be elbow)
2 eggs
1 stick of salted butter
1 can of evaporated milk
Cheese! (I use a combination of several kinds, I usually like to mix 4 cups/ 2 bags of sharp cheddar and colby jack, or you could shred it yourself.)
Velveeta (I know, I know. It's not real cheese but it's good and we all like it, so yeah)
Salt and pepper

Preheat the oven to 350 and put your macaroni on to boil.

While the pasta is boiling make the sauce!

Mix the eggs, melted stick of butter, salt, pepper, and evaporated milk and one bag of shredded cheese in a bowl. Once the pasta is cooked, drain and rinse, then combine with the sauce in a lined or oiled 9x13 pan.( I use Reynolds pan liner paper and it is life changing y'all!)

Next I cube up the Velveeta and press it into the pasta so I gets all melty and delicious while everything is baking.

Then sprinkle the remaining cheese on top.

Cover with foil and bake for 30 minutes. Then uncover and bake for an additional 10 minutes.

That's it! Super delicious, unhealthy, kid approved mac and cheese!

Friday, January 24, 2014

Kellen is 4 months!

Wow! Time has gone by too fast with my little peanut man. He was 4 months old on Thursday. I would have posted on his actual birthday but this week was WILD! We have had meetings, parent conferences, girl scouts, we have been running from 5:30 in the morning until 10 at night.This weekend is going to be magical 2 whole days of doing nothing.


So Mister Kellen... You are my chunk! Grandma and papa got you a shirt that says "beach hunk", I am looking for a "c" to iron. You love to eat. All. The. Time.
We started cereal for the first time on Monday. You cried at first and spit most of it out, but you slept like a champ that night, I am talking 7pm-7am! We will just have to keep at it.


You are wearing a 3-6, so pretty average, but your cheeks are so chubby!


Your sweet smile is my favorite thing in the UNIVERSE! I love that when you see me, your face lights up! Your hair is staying pretty dark and straight so far and your eyes still seem brown to me.


Loves:
*Talking and making noises! You have found your voice little boy. You talk to your toys, talk to the wall, talk to everything and everyone!

*your hands, bibs, paci and burp rags. You love to "chew" on things

*Your snail toy and changing table mirror, you already seem to keep yourself busy, yay!


Not a fan of:
* You still hate getting in your car seat. It's pretty much the worst 30 seconds of the day for all parties involved.

*Napping during the day. Kid, you sleep all night and then some, but there is no tricking you. If there is day light, you are awake and ready to play.

*Tummy time. You would rather suffocate than use your neck.


Firsts:

*Christmas. You didn't have a clue what was happening, but you loved being held and watching the bright lights!

*First bible school class in the church nursery. You laid on the floor and loved watching the bigger babies.

* Time eating solid food. The jury is still out on this one...


Sunday, January 19, 2014

cookie dough cupcakes


This weekend Brien got to try out his new smoker and make ribs for my parents, my brother and his wife. I was on dessert duty ( my favorite)! I have tried this recipe from scratch several times before and I have never had it come out quite right. This time was the best so far! So you need:

1 box brownie mix (prepare as instructed on the box, mine required 2 eggs, 1/3 cup oil and 1/4 cupwater)
1 package of break apart chocolate chip cookie dough
regular sized muffin/cupcake tin
1 brick (8 oz) 1/3 fat cream cheese (softened)
1/2 cup of butter (softened)
2 tsp of vanilla extract
3-4 cups of powdered sugar


1. Prepare brownies as directed on box:
2. Then roll the cookie dough into balls.


3. Coat muffin tins with cooking spray. Fill the muffin tins about 3/4 full with the brownie mixture, then press the cookie dough balls into the brownie batter.( I should have used cupcake liners, but we were out)

4. Bake the brownie/cookie cups for 18 minutes at 350. Check the brownie mixture to see if it is cooked through, a tooth pick should come out pretty clean at 18 minutes. Cook longer as needed.

5. While brownies cook, mix up frosting

6. Whip the butter, cream cheese and vanilla extract together using electric mixer for about 2 minutes. Slowly add in the powdered sugar one cup at a time.

7.*** allow the brownies to cool or remove them from the cupcake pan after they have had time to cool. (I tried to get them out too soon and a few of them fell apart) I waited about an hour.

8. I put my frosting mix in a gallon plastic bag and cut off the corner to frost the brownie cup cakes!
They were pretty easy and super yummy!

Saturday, January 18, 2014

Did you know...???

It has been a busy few weeks, especially on the weekends! Today was the first day in LOOOONNNGGG time that we didn't have a million errands to run or things to do and it was great!
So, did you know...
Cowgirl boots make you a real life cowgirl?
Combines are great playgrounds? (thanks, Corey and Adriane!)

When we all wear our Bronco shirts, they win??

That 7 year old girls can wear 4T dresses and that's okay??
That garter belts make great headbands?
That, in addition, to being a full time teacher and mom, I am a executive producer for the NatGeo channel?? (see name in bottom corner)
That this baby and my older baby are tied for the cutest baby ever??
That papa's are great tooth pullers??

Thursday, January 16, 2014

What I wore Wednesday (on a Thursday)


 Most mornings are a little crazy at our house and for some of the pictures my photographer was a 7 year old,  but here are some of my favorite outfits from the past week!

Chevron dress: Target
Belt: Target
tights: target
patent heels: target

Pancho: gift
Denim Leggings: Forever 21
long sleev tee: forever 21
boots: target
necklace: gift
sweater: old navy
skirt: adorn
tights:target
teal suede heels:target
pearl necklace:target
Chambray top: Forever 21 31
Leggings: Very jane
Knit chevron scarf: Adorn
Boots: Target


Tuesday, January 14, 2014

Bath towel letters

I am a little obsessed with using letters at my house. I love to put our names, initials and monograms on everything! I want to know what belongs to who and everything needs a place to be for each person in our house. I wanted Callie and Kellen to each have their own hooks in the bathroom, as the over the door hanger was starting to make dents in the wood because it was too heavy.

So I ventured to Hobby Lobby, they feed my addiction to the monogram, and found a cute "C" and a "K" for the kiddos. The I visited the scrap book paper aisle and choose some paper that would match the black, ivory and brown that I have going on in the kids bathroom. I tend to use scrap book paper on pretty much anything, except scrap books (not sure why).

I traced my letters on the scrap book paper and carefully cut them out. The I used matte modge podge to "glue" the paper on to the letter using a sponge brush. This really could not be easier!
 Once everything was dry I had my amazingly handy husband hang the letters along with some hooks that I found at Target. Now each kid knows where their junk goes!


Monday, January 13, 2014

9 years!

Last Monday marked the beginning of my ninth year teaching. I seriously cannot believe that I have been doing this for almost a decade!

At ACU, I did a victory lap (4 1/2 years of college) and was blessed beyond belief to have my first interview and job within a few days of graduating. I would be teaching 6th grade reading at a small rural school in east Texas. I loved my first position. Those students, the amazing people I worked with and just being in a small town are things that I will never forget. It's crazy to think that my first "batch" of kiddos will be graduating college in a year!

After being there for 4 1/2 years, I made the huge transition to move back home to Colorado. I was terrified to move and not have a new position lined up, but God had a plan. After being settled back with my family for about a week, I applied for every single job I was qualified for. Just a few days later, I was offered a job at a very large and very urban school. The TOTAL opposite of where I had been for the past few years. I have been at my current school for 5 years and everyday is a new adventure! 

Organization is always something that I have excelled at, but I am always happy to borrow ideas. As they say (I always wonder who "they" is?) "There are no original ideas in education." At my current school we have no main library. All of the literacy teachers have a classroom library. I, thankfully, inherited a pretty well stocked and organized my library and have streamlined my check out process and I thought I would share.


It is super easy to utilize shelf space effectively. I use plastic shoe box bins from Target or the dollar store. My books are organized according to genre which I have labeled with neon colored note cards, I love bright colors at school!  Each box is labeled and students have easy access to the books and they can reshelf them independently. Functional and pretty!

Wednesday, January 8, 2014

What I wore Wednesday

I have really struggled with clothes this past year... Holy Moly does having a baby change your whole wardrobe!  When I was pregnant, I refused to pay full price for maternity clothes, so I bought literally EVERYTHING from thrift stores, some of it was materinity, some were just a size bigger, overall it was challenging, but fun. Now I am slowly rebuilding my whole wardrobe with some new pieces and some that I already have. Here is my attempt at style
sweater: old navy
tank: thrifted
leggings: very jane
boots: target
scarf: christmas gift from meme

dress: thrifted
sweater: target
skinny jeans: target
flats: target

sweater: old navy
tank: thrifted
tights: very jane
scarf: adorn

I had to retire this sweater after wearing it, it was looking pilly
sweater dress: kohls
tights: very jane
belt: target
boots: sheplers

sweater: old navy
blouse: target
skirt: target
tights: target
boots: target

sweater: target
tank: thrifted
pants: thrifted
scarf: christmas gift
shoes: target

Tuesday, January 7, 2014

Organizing cards

I love to throw things away. It's probably one of my favorite past times. However, one thing that, for some reason, I cannot throw away is cards! Birthday cards, thank you cards, just because cards etc, I love them. I am just too sentimental to throw them away. I am thankful for this because one day I came across a card from either high school or middle school from my Nanny (My mom's mother) She passed away in 2004 and when I saw her beautiful handwriting and read her sweert words I definitely cried. I was glad I hung onto those and many other cards from family and friends.

When Kellen was born we recieved gobs of cards and letters from our loved ones and they had the sweetest words, wishes and prayers for out little boy. I surely couldn't get rid of them! Since this summer and fall though, they have sat in a box taking up valuable space in Kellen's nursary. I also had some pictures and other baby memorablia that needed a home. What a mess!
I got the inspiration from my sister in law (Thanks, Jenn) who bound all of her and my brothers wedding cards into books, I decided to do the same. Here is the finished product:
I had a cute cover sheet (an blank left over baby shower invite). Then I used the first 2 holes of a 3 hole punch to poke holes in all the cards (this took forever!) Then I used some left over twine that we had from another project to loop all of the cards together to make a book. So easy, now we have all of Kellens sweet cards in one place. One day when he is older he can see all of the sweet things that people said about him before he was born!